發表文章

目前顯示的是 7月, 2019的文章

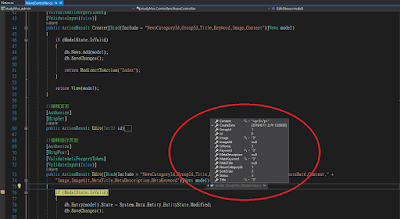
檢視表單的post參數

圖片
如下圖所示,F9 設定中斷點後,在 debug 模式下,將滑鼠移到 model 注入變數即可顯示 post 參數值。

git 版本控制 ( sourceTree & bitbucket)

圖片
採用 SourceTree 和  Bitbucket 做 Git 版本控制。 Step1 : 使用Command Line 的方式,移到專案路徑下,並輸入指令 : git init Step2 : 開啟 SourceTree 並加入Step1專案。 Step3 : 按右鍵,選擇忽略的檔案(如: .vs/ , packages/ ,專案名稱/App_Data )。 Step4 : 進行 Commit 。 Step5 : 連結  Bitbucket 進行遠端版本控制。 注意 : 專案名稱/App_Data 主要存放資料庫檔,所以必須忽略,否則會出現如下的錯誤訊息 : Git failed with a fatal error. error: open("XXX/App_Data/MyProject.mdf"): Permission denied fatal: Unable to process path XXX/App_Data/MyProject.mdf
Code First的Enabling Migrations

如果採 Code First 的開發方式,中途若追加欄位或異動資料庫,則會拋出例外錯誤訊息 : ”The model backing the 'XXXContext' context has changed since the database was created. Consider using Code First Migrations to update the database (http://go.microsoft.com/fwlink/?LinkId=238269).” 這時可以參考如下的部落格文章,建立並更新遷移檔,保持最新的資料結構版本。 Entity Framework - 使用Code First的Enabling Migrations ASP.NET Identity 搭配 Entity Framework 啟用 Code First Migration

ModelState

如果想深入了解 ModelState的作用原理 ,可參考保哥 這篇  " 深入了解 ModelState 內部細節 " 寫得很清楚,受益良多 ^_^

建立 Code First 資料庫

圖片
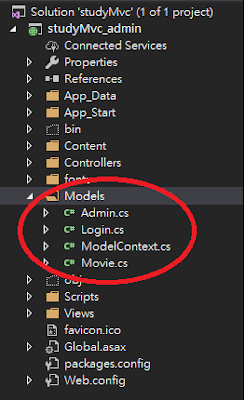
Step1 : 在 Models/ 下建立個別模型。 using System; using System.Data.Entity; using System.ComponentModel.DataAnnotations; using System.ComponentModel.DataAnnotations.Schema; namespace studyMvc.Models { //------------------------------------------------------------- // // 資料表結構 // //------------------------------------------------------------- public class Admin { [Key] public int Id { get; set; } public string Email { get; set; } public string Password { get; set; } public string Nickname { get; set; } public byte Sex { get; set; } public string Photo { get; set; } public byte Role { get; set; } public byte Status { get; set; } public DateTime CreateDate { get; set; } } } Step2 : 在 Models/ModelContext.cs 建立模型產生檔(建立資料庫)。 using System; using System.Data.Entity; using System.Collections.Generic; using System.Linq; using System.Web; namespace studyMvc.Models { public clas

localDB 預設路徑

圖片
參考官方網站的範例 :  建立連接字串以及使用 SQL Server LocalDB  一步步練習建立資料頁面,如果未指定資料連結,則預設的實體儲存路徑為何? 這時可以打開 Sql Server Management Studio ,並輸入以下查詢指令,即可找到正確的預設資料庫檔路徑: SELECT * FROM sys.database_files 若想自定義路徑,如放置到 App_Data\ 下,可在 Web.config 檔追加如下的參數設定 : <connectionStrings> <!-- 預設路徑 --> <add name="DefaultConnection" connectionString="Data Source=(LocalDb)\MSSQLLocalDB;Initial Catalog=aspnet-MvcMovie-fefdc1f0-bd81-4ce9-b712-93a062e01031;Integrated Security=SSPI;AttachDBFilename=C:\asp\repos\study98\study98\App_Data\aspnet-MvcMovie-fefdc1f0-bd81-4ce9-b712-93a062e01031.mdf" providerName="System.Data.SqlClient" /> <!-- 指定路徑 --> <add name="MovieDBContext" connectionString="Data Source=(LocalDb)\MSSQLLocalDB;Initial Catalog=aspnet-MvcMovie;Integrated Security=SSPI;AttachDBFilename=|DataDirectory|\Movies.mdf" providerName="System.Data.SqlClient" /> </connectionStrings>

第一個專案頁面

圖片
如果站在一個初學者的角度,想要練習一個MVC專案,我必須誠實地說,在PHP眾多的MVC框架中,不管是Codeigniter 或 Laravel  似乎都沒有 Asp.net mvc 來得簡單。 我之所以敢這麼說,並不是因為語言層次上的優劣,而是一套完整的IDE開發工具無縫整合的結果,號稱地表上最強的開發工具 Visual Studio 並非浪得虛名,如果你是PHP開發者,你可以看我底下的展示,應該就能理解我說的對於初學者而言,"簡單" 這個論點。 這是開發一個ASP.NET MVC 專案的簡易流程 : Step1 : 打開 Visual Studio 2019 ,建立一個新專案,並命名為 "study99"。 Step2 : 選擇一個 MVC 專案,因為Asp.net 有多種網站開發類型,所以這邊要做一個選擇,此外若選擇右邊的 "Authentication" 則會生成登入和註冊功能頁面,這等同於你在Laravel Command 下輸入: php artisan make:auth Step3 : 只需上述幾個點選步驟,就完成一個MVC專案了,底下是檔案目錄結構。 Step4 : 底下是專案頁面。 後記 : 過程中你完全無需像學PHP一樣搭建 LAMP 或 XAMPP 甚至是 Homestead 環境,因為  Visual Studio 已內建一個簡易版開發專用的 IIS。